
How to work on different topics in parallel
Branching out topics
Section titled “Branching out topics”Often, you will want to work on different topics in parallel and keep them separate from the main codebase. Those topics include the development of new features, bug fixes, or experiments. Git lets you create separate lines of development called branches. You can think of a branch as an isolated copy of your project where you can experiment and develop without affecting the main version of your code.
Once you are satisfied with the changes, you can merge them back into the default branch, where the latest changes of the projects are reflected.
Usually, the default branch is called main; in the past it was often called master.
When you want to work on a new feature or fix a bug, you create a new branch from the main branch.
This is the recommended best practice.
There are different ways to create branches: from the repository’s main page, from an issue, and a few more. Here we will explain the way to do it from the repo’s main page:
-
Go to your repository.
-
Click on the following dropdown button for branches. If it says
mainthis means that you are branching out from the main branch.
-
In the text field, type the name of your new branch (e.g.,
feature-xyz). -
Then, underneath the text field you will see something like:
Create branch feature-xyz from main
Click on that to create the branch.
-
Go to your repository.
-
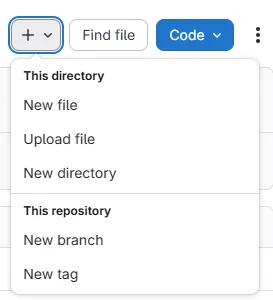
Click on the ➕ dropdown button.
-
Select
New branch. -
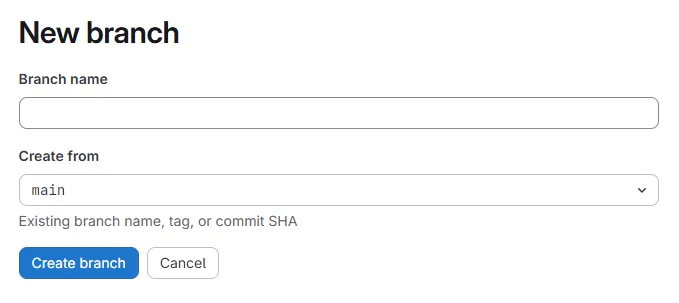
Provide the name of the new branch and select where you want to branch out from.
git switch -c feature-xyzThis creates feature-xyz from your current branch and switches to it in one step.
You may also use git checkout -b feature-xyz, the older equivalent.
See checkout for the difference.
Now you’ve created a new branch, so you can start working on your new feature or bug fix.
If you are curious what it looks like in the commit history, you can always check the Network graph, described in the section Check the history.
This will show you a graphical representation of your branches and commits.
You will notice that the new branch is simply a pointer to a specific commit in the history.
If the branch is freshly created, it will point to the same commit from the parent branch it was created from, in this example the main branch.
This means that at this point, both branches have the same code.
However, as you make changes in the new branch, it will diverge from the parent branch.
Switch between branched-out topics
Section titled “Switch between branched-out topics”-
Go to your repository.
-
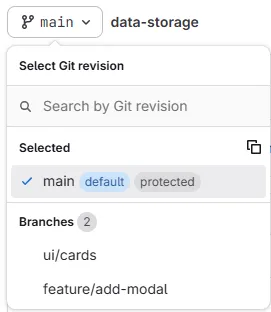
Click on the branch dropdown button right below the repository name.
-
Select the branch you want to switch to (e.g.,
feature-xyz).
-
Go to your repository.
-
Click on the branch dropdown button right below the repository name.
-
Select the branch you want to switch to (e.g.,
feature-xyz).
git switch feature-xyzYou may also use git checkout feature-xyz, the older equivalent.
See checkout for the difference.
Once you switch to a branch, the files in your repository will be updated to reflect the state of that branch. You can now make changes to the files. Once you commit them, they will be pushed to the branch that you chose from the drop-down in the beginning.
Merge branches
Section titled “Merge branches”Once you are happy with your work done in a branch, you can merge it back into another branch, in this example the main branch.
This ensures that your changes are integrated into the main codebase, so they can be used by others.
-
Go to your repository.
-
Click on the
Pull requeststab. -
Click on the green
New pull requestbutton.
-
Select the branch you want to merge into (e.g.,
main) and the branch you want to merge from (e.g.,feature-xyz). After that, you will see a comparison of the two branches and a list of commits that will be merged.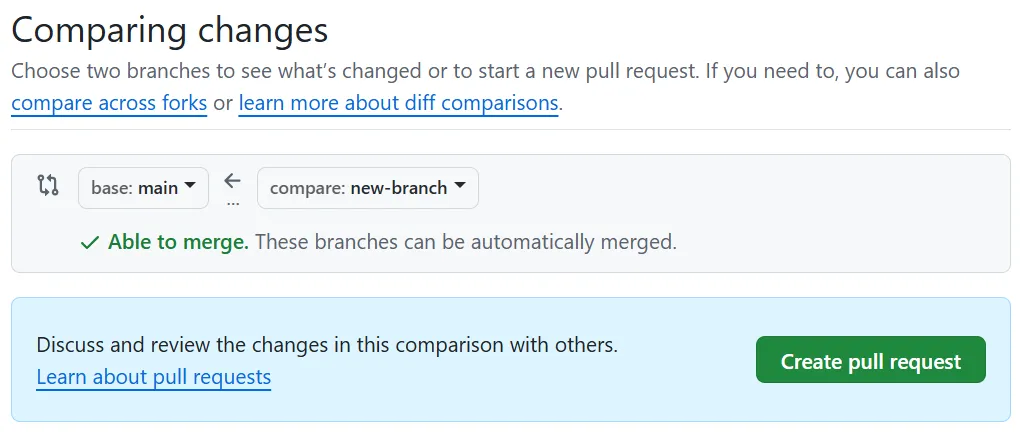
-
Click on the green
Create pull requestbutton. -
In the newly opened page, you can add a title and a description for your pull request. Later you will be able to find that pull request by that title. The description is where you can explain the changes that you have made and why they are important. You can also assign reviewers to your pull request, so they can review your changes and give feedback.
-
Once you are done, click on the green
Create pull requestbutton again.
-
Go to your repository.
-
Click on
Code>Merge requestson the left-hand side menu. -
Click on the
New merge requestbutton. -
Select the branch you want to merge from (e.g.,
feature-xyz) and the branch you want to merge into (e.g.,main). Then click on theCompare branches and continuebutton. -
In the newly opened page, you can add a title and a description for your merge request. Later you will be able to find that merge request by that title. The description is where you can explain the changes that you have made and why they are important. You can also assign reviewers to your merge request, so they can review your changes and give feedback. At the bottom of the page you will see a comparison of the two branches and a list of commits that will be merged.
-
Once you are done, confirm by creating the merge request.
After that, your pull request will be created and you can see it in the Pull requests tab.
You can continue to work on your branch, and after every commit, the pull request will be updated with the new changes.
Once the work is done, you can merge the pull request by clicking on the green button that says Merge pull request, Squash and merge, or Rebase and merge.
Usually, you use Merge or Squash - more details on this topic can be found here.
This will merge your changes into the main branch and close the pull request.
Resolve conflicts
Section titled “Resolve conflicts”Sometimes Git cannot merge two branches automatically. This happens when the same part of a file has been changed differently in both branches. Git will report a merge conflict and ask you to decide which changes to keep before the merge can be completed. Although conflicts may seem intimidating at first, they are a normal part of collaborative development. GitHub provides tools to help you resolve simple conflicts directly in the browser, while more complex conflicts can be resolved in your local editor.
Before merging your branch into main, it is good practice to first bring the latest changes from main into your own branch.
This helps you discover and resolve any conflicts before your changes are merged into the main codebase, making the final pull request easier to review and less likely to cause problems for others.
The simplest way to do this is by merging main into your branch.
CLI
From the CLI, this looks like:
git fetchgit merge origin/mainIf Git reports a conflict, it marks the affected lines directly in the file with <<<<<<<, =======, and >>>>>>> markers.
Edit the file to keep the changes you want, remove the markers, then run git add <file-path> and git commit to complete the merge.
Use git status at any point to see which files are still conflicted, or git merge --abort to back out and start over.
Another common approach is rebasing, which moves your commits so they appear as if they were created on top of the latest version of main.
Rebasing results in a cleaner, more linear project history, but because it rewrites commit history, it should be used with care, especially on branches that are shared with others.
On collaborative branches, merging is simpler and safer.
While rebasing is a useful technique, it is best kept to your own branches; it’s a sharp tool, so it is recommended to learn its basic rules before you use it.